Connecting FileMaker to an Oracle Database Using ESS on Windows

FileMaker’s External SQL Sources allows a database created in FileMaker to display and manipulate data from any ODBC compliant data source. All FileMaker needs is a system DSN (data source name) to be created. Most database software, including Oracle, offers ODBC drivers with which to create these DSNs.
Normally creating a DSN is fairly straight-forward. MySQL, for example, simply requires you to specify the location of the server (IP address), username, password and database name. Oracle, one the other hand, forces you to go through a much more complicated and convoluted process. This post provides instructions for users to set up an ESS connection from Filemaker on Windows to an existing Oracle database. In the examples provided below the version of Oracle used is Oracle Database XE 11.2 hosted on Windows Server 2008 R2 and the Filemaker version is Filemaker Pro Advanced 12 on Windows 7.
Installing Oracle Instant Client and ODBC Drivers
The first thing you need to do to connect FileMaker to Oracle is to download Oracle’s ODBC drivers. Unlike many other technologies, Oracle requires you to download an application as well. This application is known as the Oracle Instant Client.
The Instant Client is completely free of charge, however they do require you to create an oracle account as well as accept some terms of use before you can download it. The Instant Client software is available for many different operating systems however this article will focus on Windows. That being said, Mac users may still find parts of this article helpful.
As of writing this article, you can download the Oracle Instant Client here
Please note that you must download 32 bit versions of both of the following files:
Instant Client Package – Basic
Instant Client Package – ODBC
FileMaker Pro does not currently support connections with 64 bit ODBC drivers.
The version of Instant Client that you download should match the version of Oracle that you are trying to connect to.
Download and unzip both archives into the same folder.
Run odbc_install.exe from inside the folder. This program should register the Oracle ODBC drivers with your system.
Creating the tnsnames.ora Configuration File
Now that you have the Oracle ODBC drivers installed, you can go ahead and create your system DSN that FileMaker needs to connect to Oracle. This process, however, is actually more complicated than simply going to ODBC Data Sources, selecting the right ODBC driver and entering the Oracle server’s information. Before you can do that, you’ll first need a tnsnames.ora configuration file.
The tnsnames.ora file is a text file that contains connection information for the oracle database(s) that you are trying to connect to. This is where things can get a bit tricky. The best way to get your hands on the information needed to create this file is to run a tool located in the bin directory of the Oracle server called LSNRCTL.exe
More information about the tnsnames.ora file can be found here
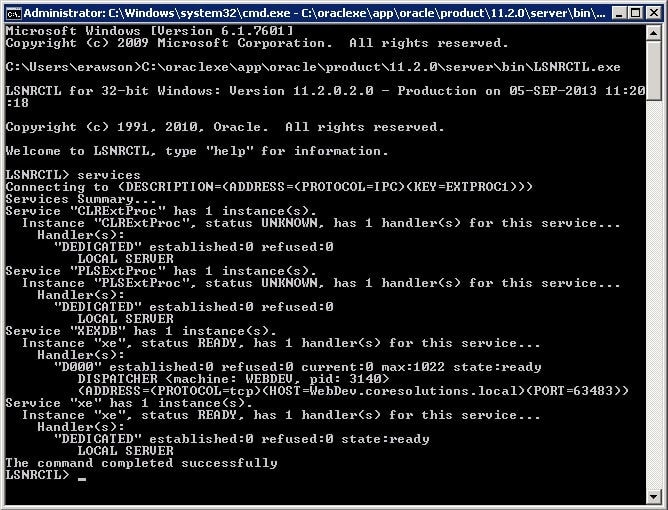
In this screenshot I have used the “services” command which lists all of the service handlers that are currently listening for connections. In this case, we see the service XEXDB has an instance which in turn has a handler that is listening for TCP connections on port 63483. This is the information that we are going to use to create our tnsnames.ora file.
Note: Depending on your network security, it may be necessary to allow incoming connections to the Oracle server on the port specified (in this case 63483) in your server’s firewall settings.
Our tnsnames.ora should now look something like this:
									Oracle_Filemaker_DSN =

									(DESCRIPTION =

									(ADDRESS_LIST =

									(ADDRESS = (PROTOCOL = TCP)(HOST = WebDev.coresolutions.local)(PORT = 63483))

									)

									(CONNECT_DATA =

									(SERVICE_NAME = XEXDB)

									)

									)
Note: By default the port that Oracle uses is dynamic and could change if the Oracle database server is restarted, which would cause you to need to update your tnsnames.ora file / firewall settings. I recommend looking into setting up a static port for your services, more information on how to do this
This article does not go into detail about setting up or configuring the Oracle server itself. Click here for More information about LSNRCTL.exe
If you do not have access to the Oracle server to run this application, you should ask the system administrator or Oracle DBA for this information.
Adding the TNS_ADMIN environment variable
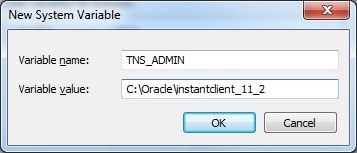
In order for the Oracle ODBC drivers to read your tnsnames.ora configuration file, they need to know where the file is located. The way this works is by creating a system environment variabled named TNS_ADMIN and specifying it’s value as the directory in which the tnsnames.ora file exists.
To create the environment variable, go to Control Panel > System, click on Advanced System Settings, click on Environment Variables, click the New button under System Variables.
Save your new environment variable and restart the computer. The operating system must be restarted for the system environment variable change to take effect.
Creating the System DSN
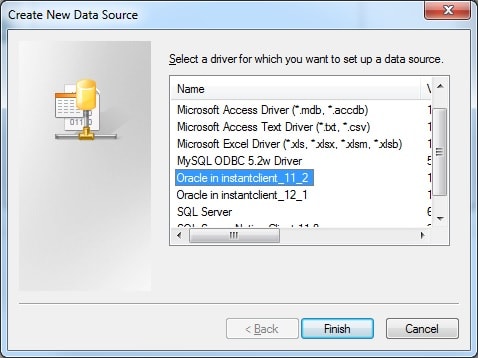
Now that you’ve installed the Instant Client and ODBC drivers, created your tnsnames.ora file, and added your TNS_ADMIN environment variable you can now finally create your system DSN. Go to Control Panel > Administrative Tools > Data Sources (ODBC), select System DSN at the top and then click Add. Choose the Oracle in instantclient ODBC driver and click Finish.
Note: If you are using a 64 bit OS, you will need to use the 32 bit version of the ODBC Data Sources dialog located here: c:\windows\syswow64\odbcad32.exe
At this point you will be prompted to give a name and description for your DSN. The dropdown for TNS Service Name should include the service that you specified in the tnsnames.ora file and the User ID should be the Oracle User ID with which the DSN will connect to the Oracle server. You should then make sure to try the Test Connection button to ensure that the connection can be established. If you cannot connect to the Oracle server, your tnsnames.ora file may not be correct or the oracle server may not be configured correctly to listen for incoming connections.
Adding the External SQL Source
Once you’ve got the 32 bit system DSN set up, you can now add it to your FileMaker database’s external SQL sources. Open up your database and go to Manage External Data Sources. Add a new ODBC data source and select the DSN that you just created.
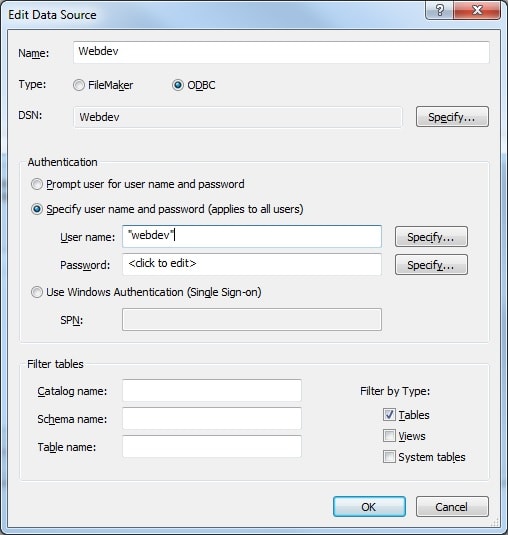
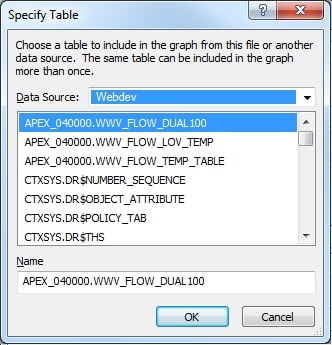
Now you should be able to add table occurrences from the Oracle database to your relationship graph.
In my experience connecting to Oracle is never an easy task, but hopefully with this article as reference you can set up your ESS connection without too many problems. I am by no means an expert on Oracle, and it is entirely possible that different versions of Oracle will behave in a completely different manner and require a different method of connection. If you come across any other helpful tips or have any questions feel free to leave a comment below.


Comments