Barcode Scanning in FileMaker Go
Recently I’ve been doing some research into doing barcode scanning in FileMaker Go. While this is something that isn’t possible natively with FileMaker, there are companies that have already looked into this problem and have created solutions. The one I’m looking at today is an iOS app called CNS Barcode, released by Comm-unity Networking systems (which costed $9.99 at the time this post is written). It’s not terribly difficult to set up, but it requires some knowledge of the FMP protocol. We discussed this in a previous blog post on creating shortcuts to a database, but one thing that wasn’t discussed was using this protocol to run scripts.
As mentioned in the previous article, the basic protocol looks something like this:
FMP://server/filename.fmp12
In order to call a script from the database, we need to specify the name of the script as a part of the FMP protocol. That would look something like this:
FMP://server/filename.fmp12?script=scriptname
We can also pass a parameter to the script as follows:
FMP://server/filename.fmp12?script=script_name¶m=parameter
One other thing to note is that if you are referencing a file on FileMaker Go that is currently hibernated, then you need to use a $ as the server name. We will come back to this later when setting up the scripts for the barcode scanning.
Creating the Scripts
Let’s assume that we are working in a file called Inventory.fmp12, and we want to set up the ability to scan a barcode and store the results in a field (lets call it barcode_data). In order to do this, we’ll need to set up two scripts – one to call the Barcode scanning app, and second to receive the results from the app and store it in the Results field. The process will basically work as follows:
- Run a filemaker script that calls the CNS Barcode app
- The CNS Barcode App opens. The user scans the barcode with the App
- The CNS Barcode App calls a script in the FileMaker database, passing the results of the scan as a script parameter
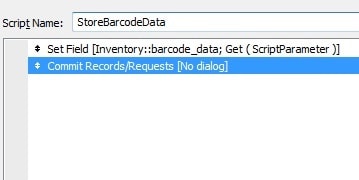
We’ll create the second script first, since we’ll need to reference the name of that script when we call the barcode app in the first script. This script is going to be pretty simple – only two lines long. Since the barcode information will get passed from the CNS Barcode app as a script parameter, then the first line will simply set the field barcode_data with that script result. The second line will just commit the record. So the resulting script will look like this:
Next we’ll build the the script that actually calls the CNS Barcode app. This one’s a little trickier, but it still boils down to a single line. Calling the CNS Barcode app uses something similar to the FMP protocol, but it looks somethin like this:
cnsbarcode://scan
This will open the app and allow to scan a barcode using the camera. However, it still doesn’t allow us to send the result of the scan back to the filemaker database. In order to do this we’ll need to send it a FMP link that specifies the name of the database and the name of the script that will process the bvbarcode data. Using our current example, the name of the database is Inventory, and the name of the script that we created to handle the barcode data is StoreBarcodeData, so the link will look like this:
fmp://$/Inventory?script=StoreBarcodeData¶m=::barcode::
Note that for the paramter, we specified ::barcode::. This is a placeholder that CNS Barcode requires; when it has successfully scanned a barcode, it will replace that placeholder with the actual results of the scan.
Now we need to modify the CNS Barcode call to include this FMP link; to do this we add a launchurl to the CNS Barcode call:
cnsbarcode://scan?launchurl=” & GetAsURLEncoded ( “fmp://$/Inventory?script=StoreBarcodeData¶m=::barcode::” )
Note: we need to use the GetAsURLEncoded function on the FMP link to make sure that it gets sent to the CNS Barcode app properly. Putting it all together, the actual script looks like this:
Open URL [No dialog; "cnsbarcode://scan?launchurl=" & GetAsURLEncoded ( "fmp://$/Inventory?script=StoreBarcodeData& param=::barcode::")]
This is a very simple scenario, so the scripts are pretty bare bones. There’s a lot more that you can with this app – for example, scanning an item and adding a new record to an inventory table, or scanning an item and then using that result to search in the inventory table for that item – but these scripts should be enough to get you started.


Comments